Quickstart
Welcome to OpenTwins, a flexible platform adapted to your needs! Although OpenTwins offers extensive customization options, we understand the importance of simplicity for beginners. Therefore, let's embark on a short journey together, showing you the quickest route to deploy the platform and develop a functional digital twin.
Installation
Prerequisites
Please be sure you have the following utilities installed on your host machine:
If you don't have a Kubernetes cluster, you can set one up on local using minikube. For a smooth deployment experience, we suggest you use the following minimum configuration values.
minikube start --cpus 4 --disk-size 40gb --memory 8192
kubectl config use-context minikube
Deploy
The quickest way to deploy OpenTwins is using Helm.
The following command adds the ERTIS repository where the OpenTwins helm chart is located.
helm repo add ertis https://ertis-research.github.io/Helm-charts/
To deploy the platform with recommended functionality, use the command below:
helm upgrade --install opentwins ertis/OpenTwins --wait --dependency-update
To modify the components to be deployed and connected during the installation, you can check the installation via Helm.
Configuration
If you've correctly installed OpenTwins Helm using the default settings, all connections should be established. The final step involves configuring the platform interface plugin by adding the addresses of the Eclipse Ditto nginx service and the Ditto Extended API component into the plugin's configuration section. Check the installation documentation for more details.
Create your first digital twin
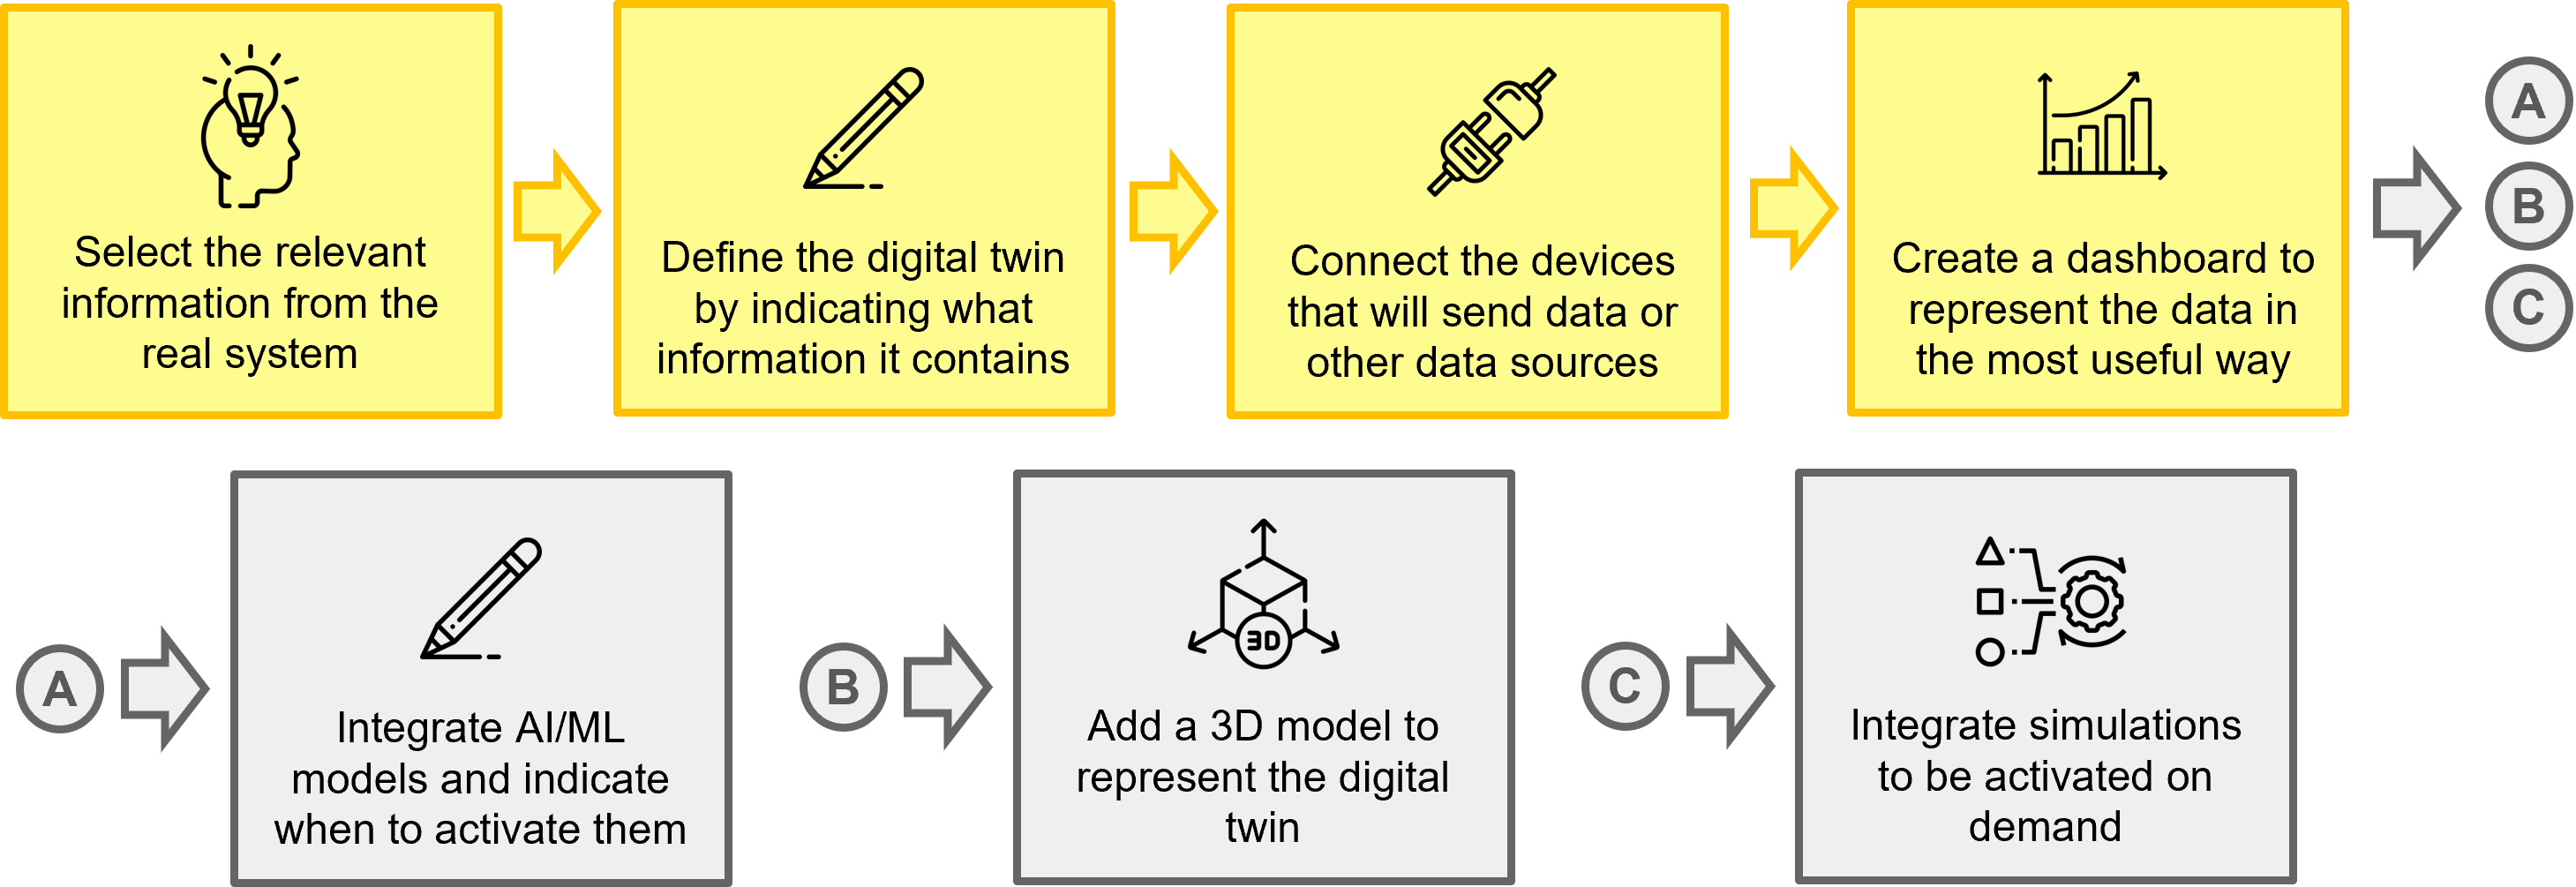
A digital twin must be at least a synchronized replica of a real system or object. To create it, the first step involves understanding the purpose of the digital twin, designing its structure and defining its most relevant characteristics. Next, it is necessary to define this information in OpenTwins and then connect the data sources that will feed the model. Finally, it is necessary to represent the data in a way that is understandable to any user.
Optionally, other useful functionalities can be added to the digital twin. In OpenTwins, we offer the integration of AI/ML models, the addition of 3D models and the execution of FMI or containerized simulations. However, this tutorial will not cover these extra functionalities, so we recommend consulting their respective guides for more information.
Following these steps, we will use OpenTwins to develop the digital twin of a car. In this case, for simplicity, we will focus only on the speed and direction of the car's four wheels. In addition, we will record the GPS location of the vehicle for tracking.
Design
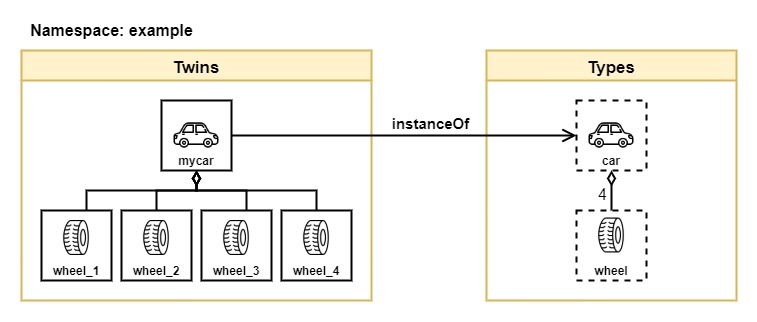
Taking advantage of the platform's functionalities, we will create a composite digital twin. For this purpose, we will define types "car" and "wheel", which will abstract information about the car and the wheel, respectively. These types will be linked by a composition relation, which means that a car comprises four wheels. Once all this is set up, instantiating the car as a digital twin will automatically generate twins for all four wheels. In this way, we can independently access the data for each wheel and easily add digital twins for other cars or other contexts.
The creation of types is not essential to create a digital twin, but it is recommended to facilitate future work. You can create digital twins directly without defining a type, just select the from scratch option in the twin creation form.
Definition
Create Car type
First, we will create the car type. To do so, we navigate to the Types section in the interface and click on the blue Create new type button. In this form, we must fill in the digital twin information that will be common for all instances. This includes the name, description and image of the twin, along with the values it will store, in this case gps. We will define this type within a namespace and assign it a name. The combination of the namespace and the name will be referred to as the thingId.
Screenshots of the filled form
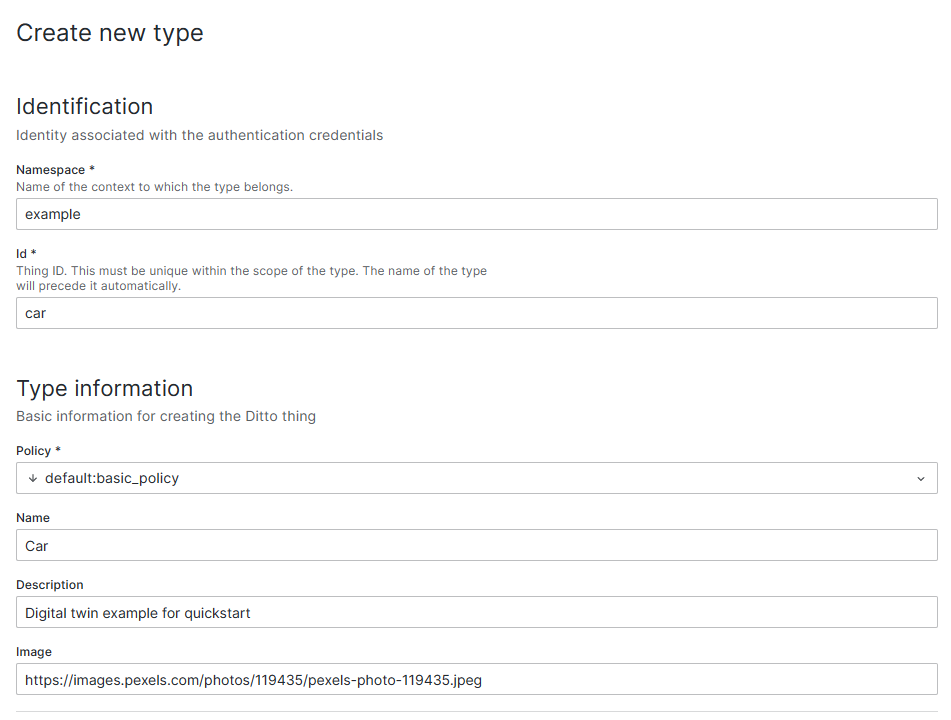

The JSON generated in Ditto Thing model is shown to the right of the form, which in this case corresponds to the following JSON:
{
    "thingId": "example:car",
    "policyId": "default:basic_policy",
    "attributes": {
        "name": "Car",
        "description": "Digital twin example for quickstart",
        "image": "https://images.pexels.com/photos/119435/pexels-photo-119435.jpeg"
    },
    "features": {
        "gps": {
            "properties": {
                "value": null
            }
        }
    }
}
Click on the blue Create type button to create the type. A message should appear indicating that the type has been successfully created. You can close this message and return to the main screen.
If you have installed OpenTwins with Helm, you should have a basic policy. Currently, we do not take into account the restriction of access to digital twins by policy, so we always use the same one. Still, using this functionality is possible with OpenTwins, although you must interact directly with Eclipse Ditto.
For more details see the Eclipse Ditto documentation.
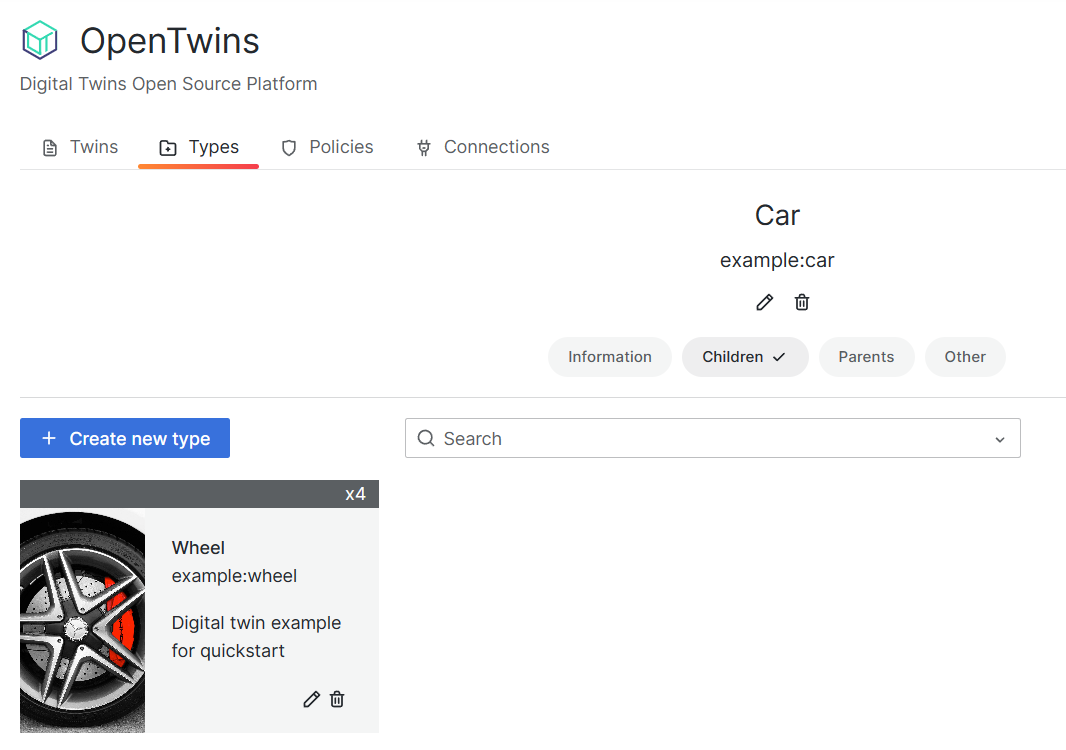
Create Wheel type
Next we will create the type for the wheels. In the list of types, we will access the type of the car we have just created to see its information. Here we select the children tab and click on the Create new type button. This form is almost identical to the previous one, with the difference that we can directly specify the number of instances of this new type to be created when a car type is instantiated. In our example we will have to indicate a 4 in this section and fill in the rest of the form as before. This type, in addition to its identification and basic information, will have as features the velocity and direction of the wheel.
Screenshots of the filled form
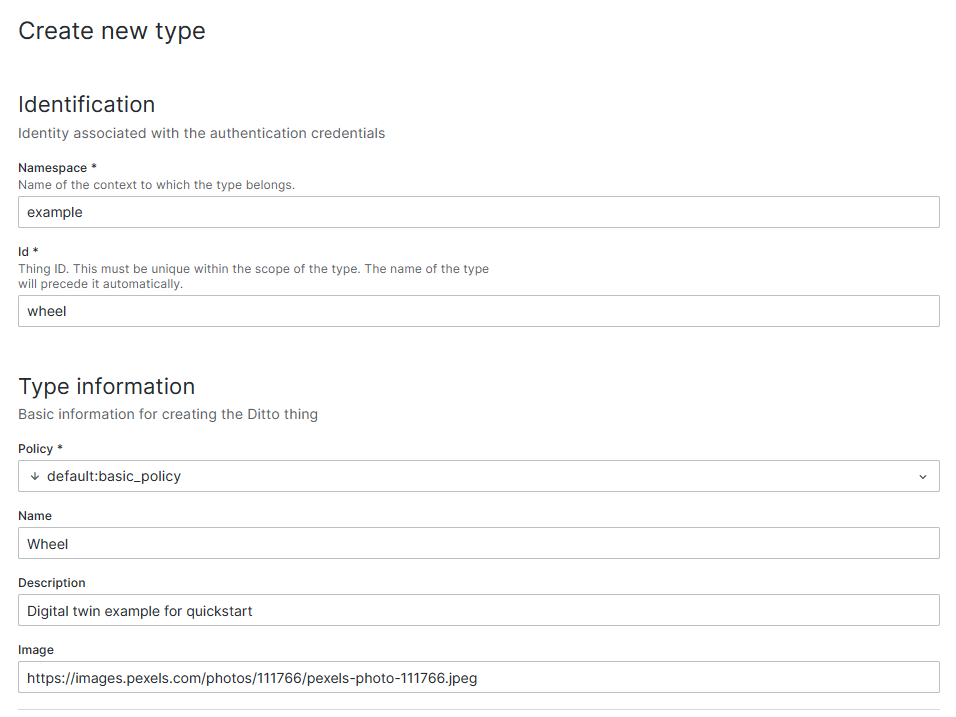
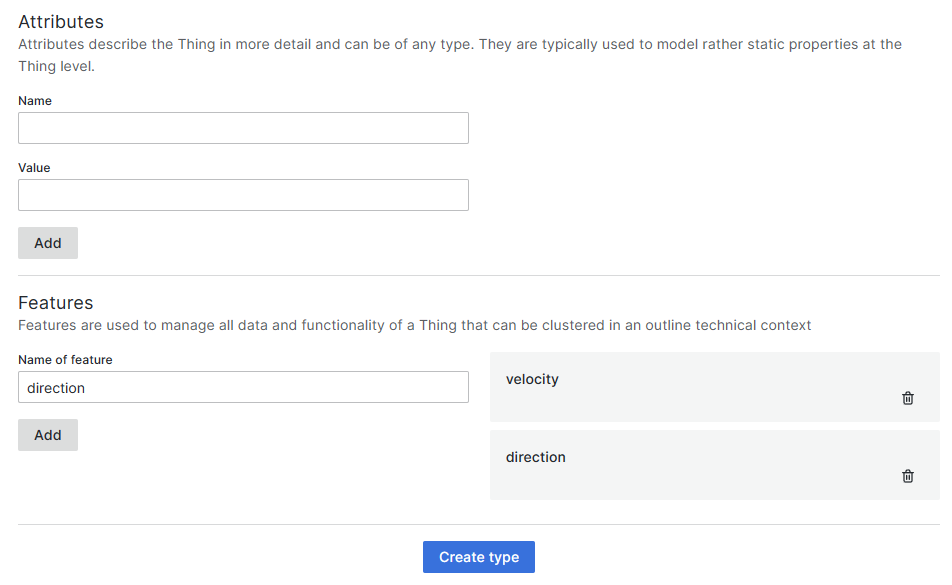
In this case the JSON of the generated Ditto Thing is the following:
{
    "thingId": "example:wheel",
    "policyId": "default:basic_policy",
    "attributes": {
        "name": "Wheel",
        "description": "Digital twin example for quickstart",
        "image": "https://images.pexels.com/photos/111766/pexels-photo-111766.jpeg"
    },
    "features": {
        "velocity": {
            "properties": {
                "value": null
            }
        },
        "direction": {
            "properties": {
                "value": null
            }
        }
    }
}
After clicking the Create type button, a confirmation message will appear. If we now navigate to the children tab of the car type, it will show that the wheel type is one of its children and will be instantiated four times.
Create the digital twins
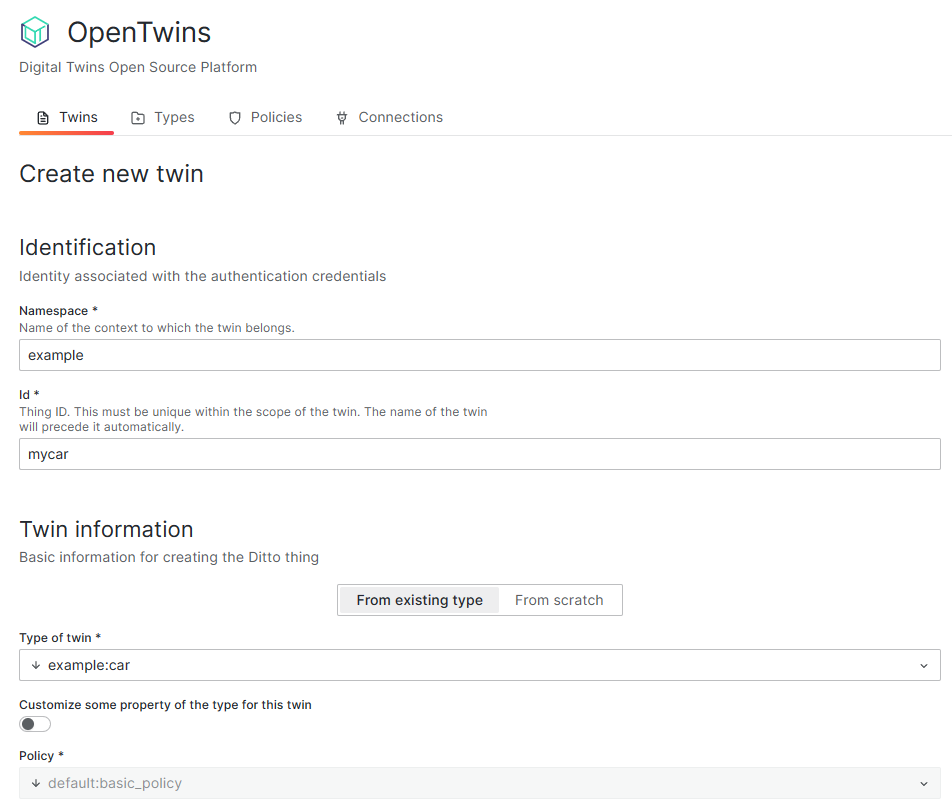
All that remains is to instantiate the car type so that all the twins are created. To do this, navigate to the Twins section and click on Create a new twin. In the form, specify the identification of the twin and select the car type. All data will be filled in automatically, though you can modify it if desired by activating the customization switch.
Screenshots of the filled form
After clicking on Create twin, the 5 digital twins will be generated automatically. A successfull message will appear when the process is finished. If we check the list of twins, we will see our twin example:car. By clicking on it and accessing the children tab, we will find four twins corresponding to its wheels, each with the features specified in their respective type.
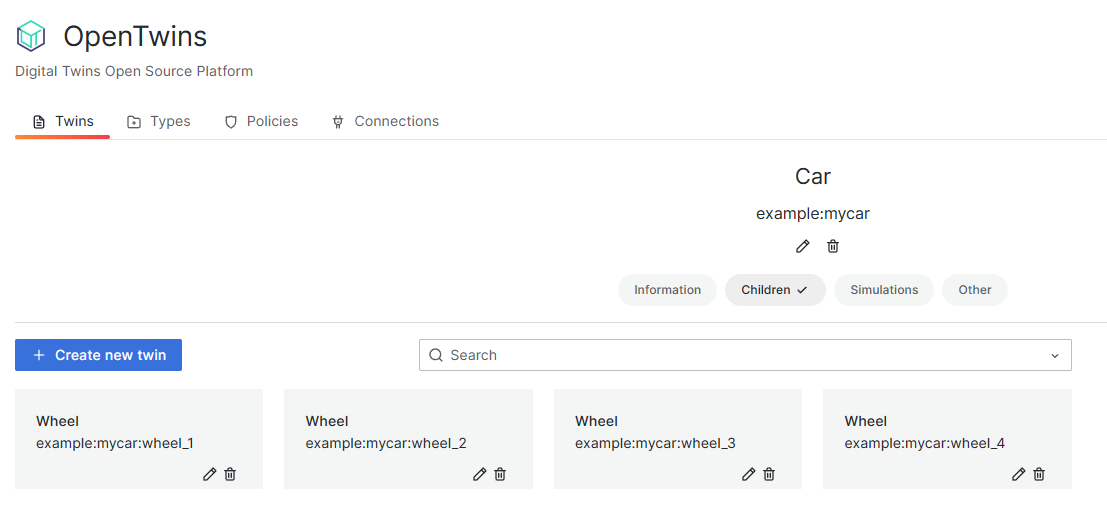
The composite digital twin has already been defined.
Connection
Once we have the digital twin defined, we need to feed it with data. Eclipse Ditto requires data updates to be sent in Ditto Protocol, which is a JSON format that indicates which parts of the digital twin we want to update and how to do it.
It is also possible to connect Eclipse Ditto with messaging brokers that use other message formats. We can add a JavaScript mapping to the Eclipse Ditto connection, which will automatically transform the messages to the Ditto Protocol format.
For Eclipse Ditto to collect the data, it is necessary to establish a connection through MQTT, AMQP or Kafka, providing all the required information (address, port, credentials, etc.).
In this example, we will take advantage of the source connection that is automatically created with the installation of Helm (mosquitto-source-connection).
This connection pulls messages via MQTT from the Mosquitto deployed with the platform, using any subtopic within the telemetry topic (i.e. telemetry/#).
By default, it does not include any JavaScript mapping, so we will send messages directly in Ditto Protocol.
If you need to use another connection, see the Eclipse Ditto documentation.
We will need to get the address of Mosquitto, which will depend on your installation.
- If you are using a cluster in your network, the address will be your cluster address and the port can be obtained by running
kubectl get servicesand looking up the NodePort of the Mosquitto service (default should be 30511). - If you are using Minikube, you must expose the Mosquitto service in order to access it from your localhost.
To do this, find the name of the service with
kubectl get servicesand then runminikube service <service-name> --url. This will return a URL with the address and port to connect to.
Since we don't have real data, we are going to create a Python script that generates random data from the car and its wheels every 5 seconds and sends it in Ditto Protocol to Mosquitto. To run the script we will need to install the Paho library for MQTT (typing_extensions is one of its dependencies).
pip install paho-mqtt
pip install typing_extensions
In the following script you must change the MQTT broker address and port to your own.
import paho.mqtt.client as mqtt
import random
import time
import json

# Digital twin info
namespace = "example"
car_name = "mycar"
wheels_name = "mycar:wheel_"

# MQTT info
broker = "localhost"  # MQTT broker address
port = 1883  # MQTT port
topic = "telemetry/"  # Topic where data will be published

# MQTT connection
def on_connect(client, userdata, flags, rc):
    if rc == 0:
        print("Successful connection")
    else:
        print(f"Connection failed with code {rc}")

client = mqtt.Client(mqtt.CallbackAPIVersion.VERSION2)
client.on_connect = on_connect
client.username_pw_set(username, password)
client.connect(broker, port, 60)

# Data generator
def generate_wheel_data():
    velocity = random.uniform(0, 100) # Generate random velocity (between 0 and 100 km/h)
    direction = random.uniform(-45, 45) # Generate random direction (between -45 and 45 degrees)
    return velocity, direction

def generate_gps_data():
    latitude = random.uniform(-90.0, 90.0)
    longitude = random.uniform(-180.0, 180.0)
    return latitude, longitude

# Ditto Protocol
def get_ditto_protocol_value_car(time, latitude, longitude):
    return {
        "gps" : {
            "properties": {
                "latitude": latitude,
                "longitude": longitude,
                "time": time
            }
        }
    }

def get_ditto_protocol_value_wheel(time, velocity, direction):
    return {
        "velocity" : {
            "properties": {
                "value": velocity,
                "time": time
            }
        },
        "direction": {
            "properties" : {
                "value": direction,
                "time" : time
            }
        }
    }

def get_ditto_protocol_msg(name, value):
    return {
        "topic": "{}/{}/things/twin/commands/merge".format(namespace, name),
        "headers": {
            "content-type": "application/merge-patch+json"
        },
        "path": "/features",
        "value": value
    }

# Send data
try:
    while True:
        t = round(time.time() * 1000) # Unix ms

        # Car twin
        latitude, longitude = generate_gps_data()
        msg = get_ditto_protocol_msg(car_name, get_ditto_protocol_value_car(t, latitude, longitude))
        client.publish(topic + namespace + "/" + car_name, json.dumps(msg))
        print(car_name + " data published")

        # Wheels twins
        for i in range(1, 5):
            name = wheels_name+str(i)
            velocity, direction = generate_wheel_data()
            msg = get_ditto_protocol_msg(name, get_ditto_protocol_value_wheel(t, velocity, direction))
            client.publish(topic + namespace + "/" + name, json.dumps(msg))
            print(name + " data published")

        time.sleep(5)

except KeyboardInterrupt:
    client.disconnect()
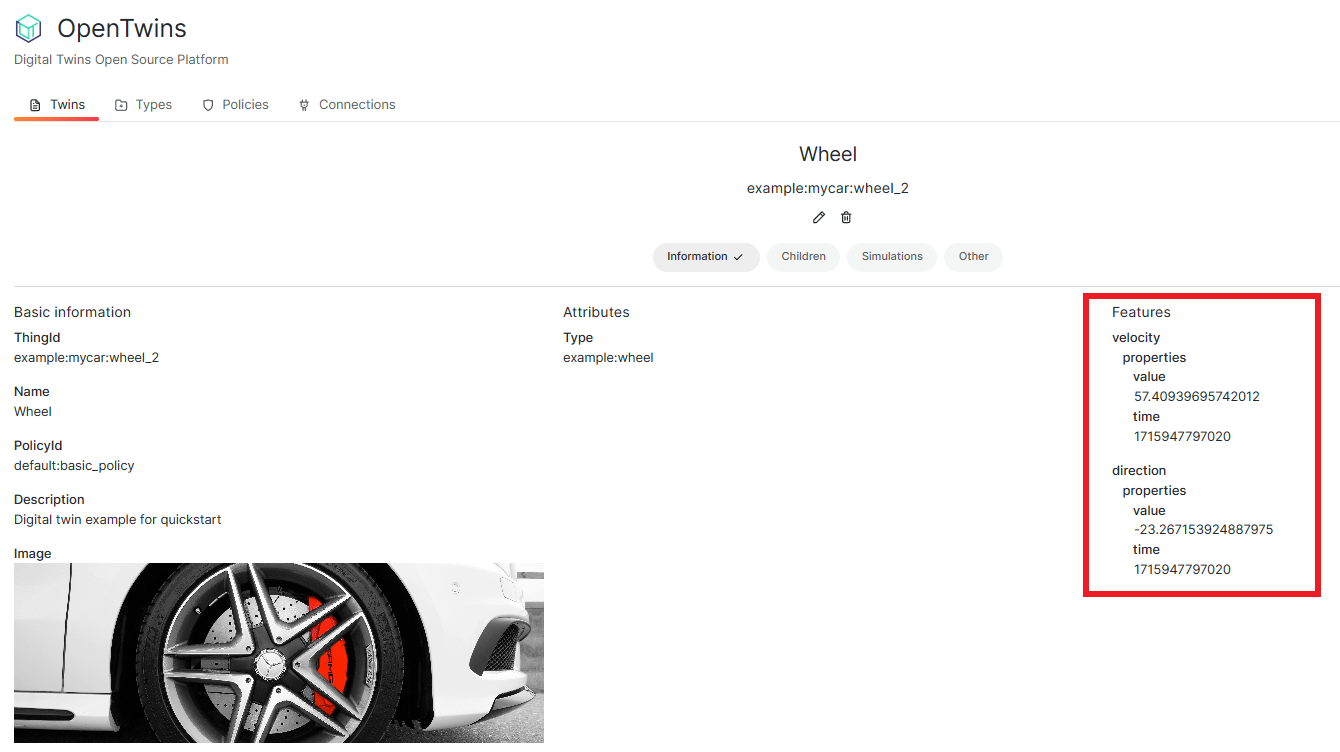
When you run the script, the data should start to be stored in the digital twins. You can see if messages are being received by checking the information of the twins, where the values of their features will now have data.
Are the twins not being updated?
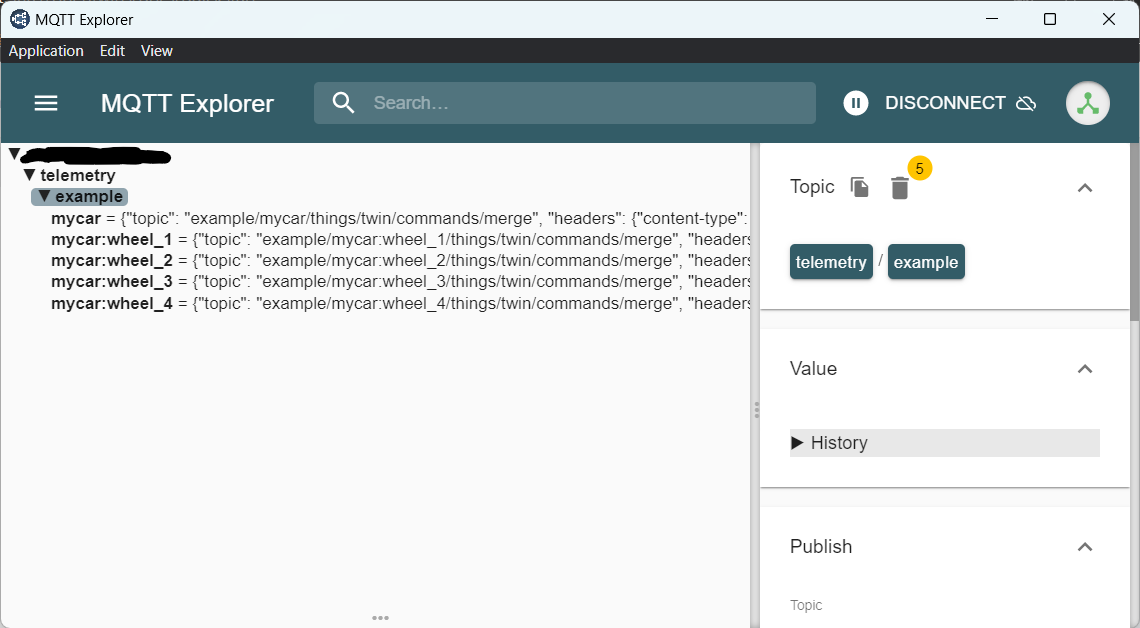
You can check if messages arrive to Mosquitto by using MQTT explorer. If they are sending correctly, you should see something like the following image:
And the messages being sent should be like these:
{
  "topic": "example/mycar:wheel_2/things/twin/commands/merge",
  "headers": {
    "content-type": "application/merge-patch+json"
  },
  "path": "/features",
  "value": {
    "velocity": {
      "properties": {
        "value": 44.07908610511725,
        "time": 1715943644787
      }
    },
    "direction": {
      "properties": {
        "value": 37.92163063527694,
        "time": 1715943644787
      }
    }
  }
}
If the messages are not being received, debug the code to see what might be happening. Most likely you are not connecting correctly to Mosquitto (wrong address or port).
If the messages are being received, then the problem is in the source connection to Eclipse Ditto. Check the connection logs with http://<ditto-ip>:<ditto-port>/api/2/connections/mosquitto-source-connection/logs.
The Eclipse Ditto ip and port are obtained the same as mosquitto's, but since Ditto has more than one service, you have to query/expose the nginx one.
Visualization
Finally, we need to present the data in a user-friendly and meaningful way for the users of the digital twin. To achieve this, we will create a new dashboard in Grafana and add panels to display the relevant digital twin information.
The digital twin data is stored in an InfluxDB2 database, so we will have to query the information using Flux language. If OpenTwins has been installed via Helm with default values, the connection between InfluxDB and Grafana should already be established, so it will only be necessary to select it as data source when creating a panel.

In this example, we will demonstrate a basic visualization. However, you can use any of Grafana's functionalities and plugins to customize it according to your specific objectives. We will create four panels: one displaying the most recent GPS data of the car, another showing the evolution of the GPS data, a third panel indicating the current direction of all the wheels, and a fourth comparing the velocity of each wheel. The result would look something like this:
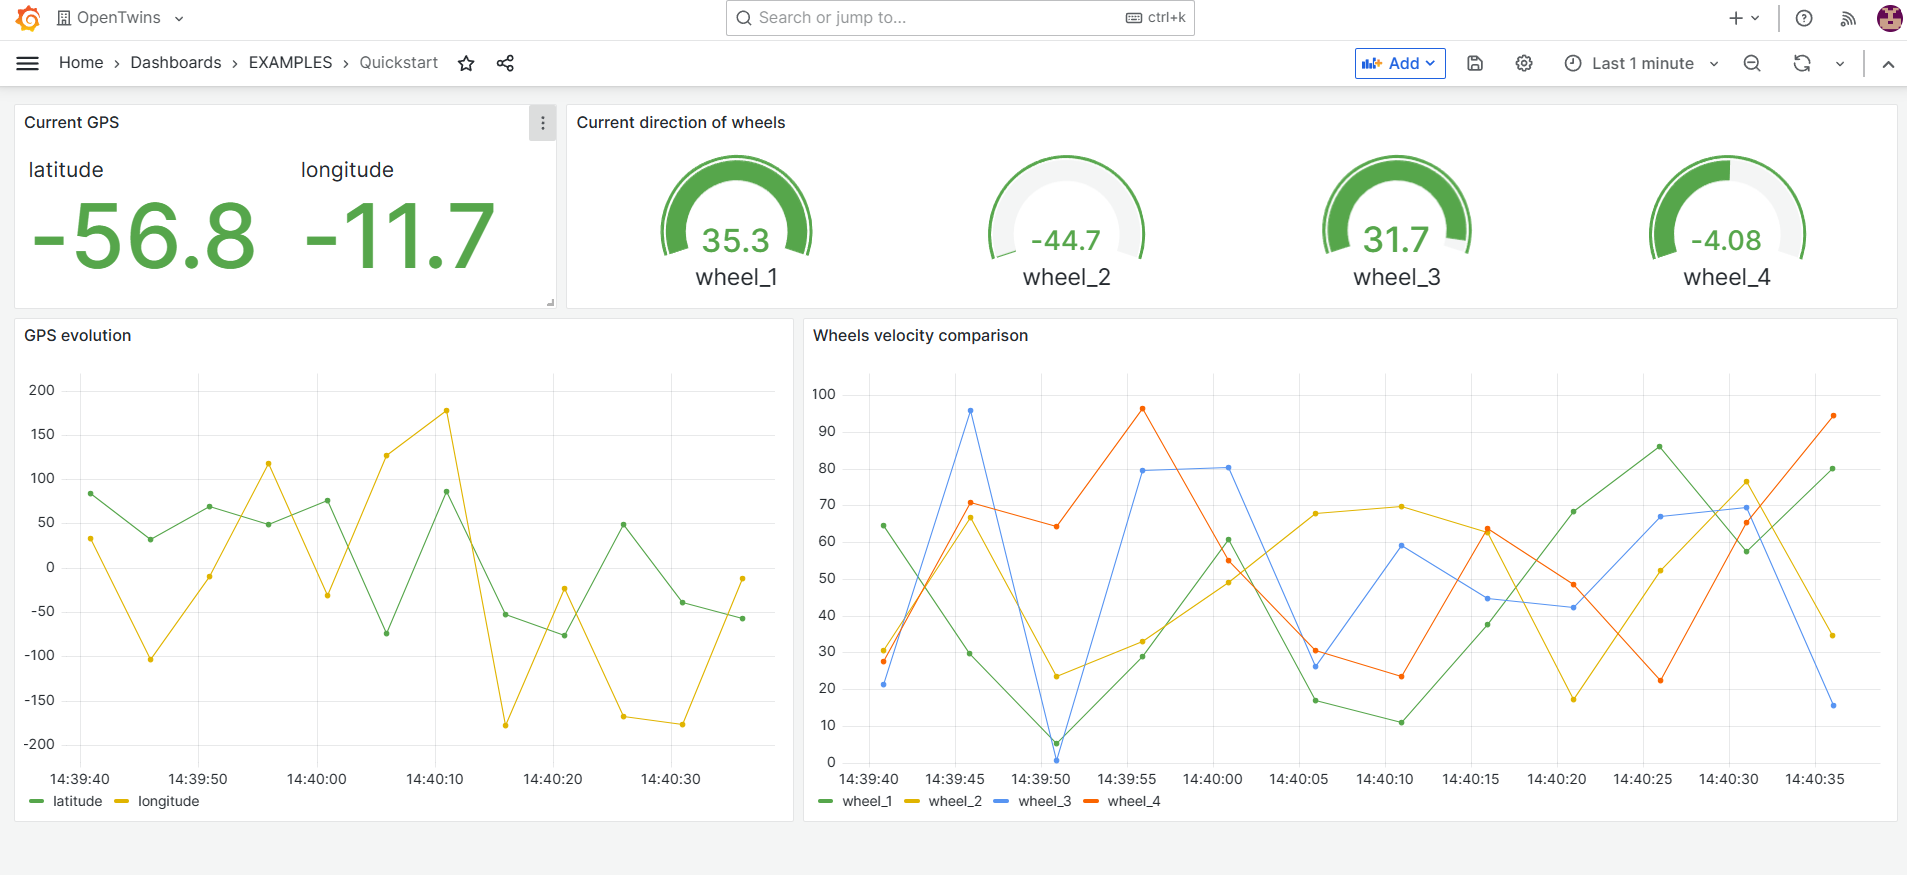
For each of the four panels, we have selected the most convenient chart type, kept the default settings and added the related query in the Query section.
The panel displaying the current GPS data extracts the longitude and latitude information from the digital twin example:mycar. It renames the fields for proper display, retains the relevant fields, sorts the results by time, and keeps only the most recent entry.
import "strings"
from(bucket: "opentwins")
  |> range(start: v.timeRangeStart, stop: v.timeRangeStop)
  |> filter(fn: (r) => r["_measurement"] == "mqtt_consumer")
  |> filter(fn: (r) => r["thingId"] == "example:mycar")
  |> filter(fn: (r) => r["_field"] == "value_gps_properties_latitude" or r["_field"] == "value_gps_properties_longitude")
  |> map(fn: (r) => ({ r with _field: strings.replace(v: r["_field"], t: "value_gps_properties_", u: "", i: 2) }))
  |> keep (columns: ["_value", "_field", "_time"])
  |> sort(columns: ["_time"], desc: false)
  |> last()
The panel for show the GPS evolution also extracts the latitude and longitude data from the digital twin example:mycar, but keeps all the entries instead of just the last one.
import "strings"
from(bucket: "opentwins")
  |> range(start: v.timeRangeStart, stop: v.timeRangeStop)
  |> filter(fn: (r) => r["_measurement"] == "mqtt_consumer")
  |> filter(fn: (r) => r["thingId"] == "example:mycar")
  |> filter(fn: (r) => r["_field"] == "value_gps_properties_latitude" or r["_field"] == "value_gps_properties_longitude")
  |> map(fn: (r) => ({ r with _field: strings.replace(v: r["_field"], t: "value_gps_properties_", u: "", i: 2) }))
  |> keep (columns: ["_value", "_field", "_time"])
The panel displaying the current direction of wheels extracts the direction data of the four twins corresponding to the wheels, identified by starting with example:mycar:wheel_. It modifies the identifiers of the twins for a more readable display and retains the most recent value based on time.
import "strings"
from(bucket: "opentwins")
  |> range(start: v.timeRangeStart, stop: v.timeRangeStop)
  |> filter(fn: (r) => r["_measurement"] == "mqtt_consumer")
  |> filter(fn: (r) => strings.hasPrefix(v: r["thingId"], prefix: "example:mycar:wheel_"))
  |> filter(fn: (r) => r["_field"] == "value_direction_properties_value")
  |> map(fn: (r) => ({ r with thingId: strings.replace(v: r["thingId"], t: "example:mycar:", u: "", i: 2) }))
  |> keep (columns: ["thingId", "_value", "_time"])
  |> sort(columns: ["_time"], desc: false)
  |> last()
Finally, the panel that makes a wheels velocity comparison is similar to the previous one, although extracting the velocity data from the 4 twins instead of the direction and keeping all the entries.
import "strings"
from(bucket: "opentwins")
  |> range(start: v.timeRangeStart, stop: v.timeRangeStop)
  |> filter(fn: (r) => r["_measurement"] == "mqtt_consumer")
  |> filter(fn: (r) => strings.hasPrefix(v: r["thingId"], prefix: "example:mycar:wheel_"))
  |> filter(fn: (r) => r["_field"] == "value_velocity_properties_value")
  |> map(fn: (r) => ({ r with thingId: strings.replace(v: r["thingId"], t: "example:mycar:", u: "", i: 2) }))
  |> keep (columns: ["thingId", "_value", "_time"])
This satisfies the basic requirements to consider a system as a digital twin. However, to take full advantage of its capabilities, we recommend including other functionalities or additional data sources. This will allow you to obtain a more complete and accurate view of the real system. You can check our guides for more information